DMARC Enforcement: From p=none to p=reject Safely
A step-by-step guide to safely enforcing DMARC on your domain. Move from monitoring to full rejection without breaking legitimate email.
Stekpad Team
Email Deliverability Experts
Why DMARC Enforcement Matters
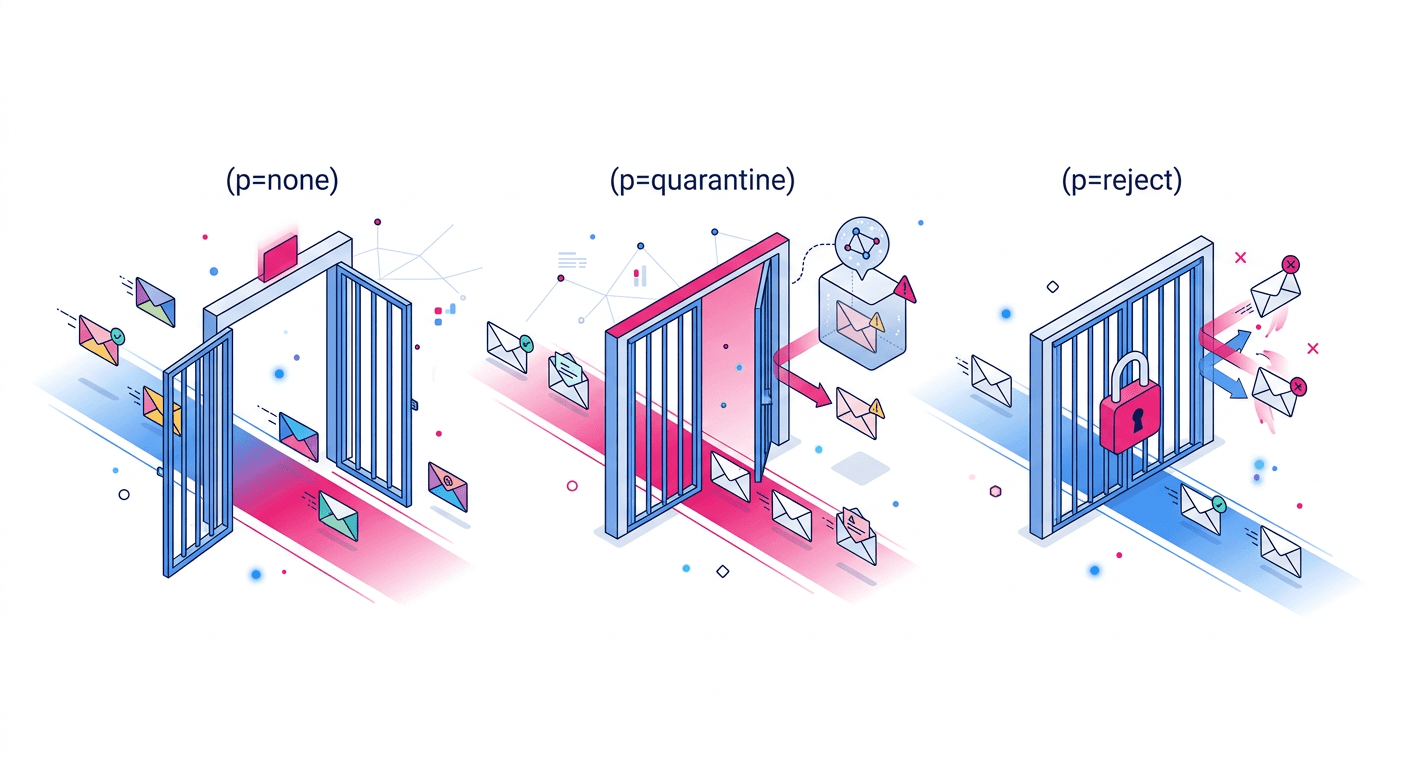
"DMARC enforcement is the difference between publishing an email authentication policy and actually enforcing it." Millions of domains have deployed DMARC at p=none — the monitoring-only policy — and left it there indefinitely. A p=none policy collects reports but instructs receiving servers to do nothing when authentication fails. Phishing emails, spoofed invoices, and brand impersonation attacks sent from your domain reach recipients unimpeded. Your DMARC record has no protective effect until you advance beyond p=none.
The urgency has increased significantly since 2024. Google and Yahoo’s bulk sender requirements mandate DMARC deployment but only require p=none as a minimum threshold. However, inbox providers now use DMARC policy level as a trust signal in their own spam filtering algorithms: domains at p=reject receive measurably better inbox placement than identical domains at p=none, because p=reject signals to providers that the domain operator has fully audited and locked down their sending infrastructure. "A p=reject DMARC policy is not just a security measure — it is an inbox placement signal that tells providers your domain is operated by a sophisticated, security-conscious sender."
The fear that holds most organizations back from advancing to p=reject is legitimate: if you move to p=reject before all your legitimate email sources are properly authenticated, you will start rejecting your own emails. Password reset emails, invoice notifications, customer support autoresponders — any email from an unlisted or misaligned source will be bounced with no delivery. This fear is the reason the staged enforcement path (none → quarantine → reject) exists. The path is safe if you follow it systematically, collect the data at each stage, and verify your authentication coverage before advancing.
This guide walks through each phase of DMARC enforcement in the sequence used by organizations that have successfully reached p=reject without email interruptions. The process typically takes 6-10 weeks from p=none to p=reject for organizations that have properly configured SPF and DKIM for all their email sources. Organizations that discover unauthenticated sending sources during the process will need additional time to fix those sources before advancing. Stekpad’s DMARC Checker validates your record at each stage, and Stekpad’s DMARC Generator builds correctly-structured records for each phase.
The business case for completing this journey is strong. Domains at p=reject experience, on average, 15-25% higher inbox placement than equivalent domains at p=none, because the enforcement level is factored into Gmail and Outlook’s sender reputation algorithms. They also experience zero successful phishing attacks using their domain name, which has both direct brand protection value and regulatory compliance value for organizations subject to data protection requirements.
Phase 1: p=none Monitoring — Collect Reports, Identify Sources
The first phase of DMARC enforcement is deploying p=none with a working report collection address. The record looks like: v=DMARC1; p=none; rua=mailto:dmarc-reports@yourdomain.com. The rua= tag is the aggregate report address — this is where receiving servers will send daily XML reports detailing every source that sent email using your domain, along with the SPF and DKIM alignment results for each source. Without a functioning report address, p=none has zero diagnostic value. Verify your report address is actively receiving emails — major providers like Gmail, Yahoo, and Outlook send reports within 24 hours of receiving your emails.
DMARC aggregate reports arrive as XML attachments and are not human-readable in raw form. Use a DMARC report parsing service or dashboard to make them actionable. Stekpad’s DMARC report analyzer processes incoming aggregate reports and presents them as a structured source list — showing you every IP address and service sending email as your domain, the authentication pass/fail breakdown for each source, and the geographic origin of each sending IP. Free options include Google Postmaster Tools for Gmail-specific data and dmarcian’s free tier for multi-provider aggregation.
During Phase 1, your objective is to build a complete inventory of every source sending email as your domain. This inventory is almost always larger than expected. In addition to your primary email provider, typical organizations discover: marketing automation platforms (HubSpot, Marketo, Salesforce Marketing Cloud), transactional email services (SendGrid, Mailchimp Transactional, Amazon SES, Postmark), customer support platforms (Zendesk, Freshdesk, Intercom), CRM systems (Salesforce, HubSpot CRM), IT monitoring and notification tools, billing and invoicing platforms, and HR systems that send employee notifications. Each of these represents an email stream that needs to be authenticated before you can advance to enforcement.
For each sending source discovered in your DMARC reports, audit its authentication status: Is it listed in your SPF record? Is it signing emails with a DKIM key that aligns with your From domain? If the answer to either question is no, you have found an authentication gap that needs to be closed before advancing to p=quarantine. Document each source, its authentication status, and the action needed to fix any gaps. "The most common Phase 1 discovery is a forgotten third-party notification service sending email as the primary company domain — often a legacy tool from a previous IT team that no one in the current organization remembers setting up." DMARC reports reveal these invisible sources with complete fidelity.
Remain in Phase 1 for a minimum of four weeks, or until all sources in your DMARC reports are consistently showing SPF pass or DKIM pass with alignment. Do not advance to Phase 2 while any legitimate source is still failing authentication. The success criterion for Phase 1 exit is: 95% or more of your total reported email volume is showing DMARC alignment pass across all sources. Use Stekpad’s DMARC Checker to validate your record configuration and confirm your aggregate report address is correctly specified.
Phase 2: p=quarantine — Gradual Rollout with pct Tag
Phase 2 begins when all your legitimate email sources are consistently passing DMARC alignment. The first quarantine record should use the pct= tag to apply the policy to only a fraction of failing emails: v=DMARC1; p=quarantine; pct=10; rua=mailto:dmarc-reports@yourdomain.com. The pct=10 setting tells receiving servers to apply the quarantine policy to 10% of emails that would otherwise fail DMARC — the remaining 90% of failures are treated as if the policy were p=none. This allows you to observe the effect of enforcement on a small sample without putting all your email at risk.
Monitor your DMARC reports and your inbox placement metrics for 5-7 days after deploying p=quarantine at pct=10. What you are looking for: Are any of the emails being quarantined from sources you recognize as legitimate? If so, you have discovered an authentication gap you missed in Phase 1 — a service that occasionally sends email as your domain but did not appear consistently enough in your aggregate reports to be noticed. Fix the gap before advancing. If all quarantined emails are from unknown or clearly malicious sources (phishing attempts, spam operations), your authentication coverage is solid.
"The pct= tag is the safety valve of DMARC enforcement — it lets you test the effect of your policy on a representative sample before committing to full enforcement." After confirming clean results at pct=10 for one week, advance to pct=25, then pct=50, then pct=100, spending approximately one week at each level. At each increment, review your reports for any newly-surfaced legitimate sources that are failing. The progressive pct increase is especially important for large organizations with many sending sources, where the 10% sample at pct=10 might not capture every edge case.
When you reach p=quarantine; pct=100, all emails failing DMARC alignment from your domain are routed to recipients’ spam or junk folders rather than the inbox. Monitor for 1-2 weeks at full quarantine before advancing to p=reject. During this period, look for any complaints from internal stakeholders that their emails or automated system notifications are being quarantined. If issues surface, check the DMARC aggregate reports for the failing source, diagnose the authentication gap, and fix it before advancing. The goal of p=quarantine is to create a visible failure signal that surfaces any remaining authentication gaps — p=quarantine failures show up in recipients’ spam folders, creating natural feedback channels you did not have at p=none.
Stekpad’s DMARC Generator creates the correctly-formatted record for each step of this process, pre-configured with the appropriate pct= values and policy settings. The DMARC Checker verifies your record is correctly published and syntactically valid at each stage. Use both tools every time you update your DMARC record during the Phase 2 progression to catch any DNS entry errors before they propagate.
Phase 3: p=reject — Full Enforcement
Phase 3 is the goal state: p=reject; pct=100. At full rejection enforcement, any email that fails DMARC alignment is refused delivery entirely by receiving servers. The email does not reach the recipient’s spam folder — it is rejected at the SMTP layer and returned to the sending server as a bounce. For legitimate email with proper authentication, this makes no difference whatsoever. For phishing emails and spoofing attempts using your domain, full rejection means they never reach your customers, partners, or employees.
The transition to p=reject should follow the same graduated pct= approach used in Phase 2, starting at pct=10 and incrementing weekly: v=DMARC1; p=reject; pct=10; rua=mailto:dmarc-reports@yourdomain.com. At this stage, failures are more severe — rejected emails bounce back to senders rather than being quarantined — so the incremental approach is even more important than in Phase 2. Any legitimate source that was somehow missed through Phases 1 and 2 will now generate bounce responses, which are typically easier to diagnose than silent quarantine failures.
"The most common reason DMARC deployments stall at p=quarantine is the mistaken belief that p=reject is riskier than p=quarantine. In practice, p=reject failures are more visible and easier to diagnose because senders receive explicit bounces — unlike p=quarantine failures, which silently route mail to spam with no feedback." Many IT and deliverability teams actually find the final transition to p=reject smoother than the earlier phases because the explicit bounce signals make any remaining authentication gaps immediately obvious.
Once you reach p=reject; pct=100, add the sp= tag to protect your subdomains: v=DMARC1; p=reject; sp=reject; rua=mailto:dmarc-reports@yourdomain.com. Without sp=reject, subdomains inherit p=none behavior regardless of your main domain’s policy. Attackers who discover your main domain is at p=reject will often attempt to spoof subdomains (notifications.company.com, noreply.company.com) that may not be explicitly covered. The sp= tag closes this gap. If you have legitimate subdomains that send email, those subdomains need their own SPF and DKIM configured and verified before sp=reject is applied.
Maintaining Enforcement: Ongoing Monitoring with Stekpad
Reaching p=reject is not the end of your DMARC journey — it is the beginning of the maintenance phase. DMARC enforcement creates a system that actively rejects unauthenticated email, which means any future authentication gap immediately has consequences. When your organization adds a new email service, that service must be authenticated before any emails are sent — otherwise its emails will bounce under p=reject. The change management process is even more critical under DMARC enforcement: every new email-sending service must be authenticated before it is permitted to send.
Monitoring your DMARC aggregate reports remains essential even after reaching p=reject. Reports will show you the ongoing source distribution of email using your domain, which is useful for detecting unauthorized services, new integrations that were added without authentication, and external phishing attempts. A domain at p=reject that stops monitoring its DMARC reports loses the visibility needed to catch authentication gaps before they cause email interruptions. Monthly report review is the minimum recommended cadence; weekly is better for large organizations with active development teams adding new services regularly.
DKIM key rotation is a maintenance task that intersects with DMARC in an important way. When you rotate a DKIM key, there is a brief period where newly-signed emails are using the new key while DNS is still propagating. If DNS propagation is slow or the old key is revoked before the new one is globally visible, emails may fail DKIM verification temporarily — which under p=reject causes bounces. Plan DKIM rotations carefully: publish the new public key in DNS and verify global propagation before switching your mail server to the new signing key, and keep the old key published for at least 24 hours after the switch to cover any in-transit emails still using the old signature.
Stekpad’s DMARC Checker provides on-demand validation of your current DMARC record across all phases of enforcement. The Domain Health dashboard monitors your authentication records continuously and alerts you within 24 hours of any change to your SPF, DKIM, or DMARC records — whether the change was intentional or not. This automatic change detection is the safety net that catches accidental authentication breaks before they compound into multi-day deliverability incidents.
"Every organization that completes the journey to p=reject with continuous monitoring in place achieves two things simultaneously: the highest available inbox placement signal from their DMARC policy level, and complete protection against domain spoofing attacks that could damage their brand and their customers." Stekpad’s Domain Health tools — SPF Checker, DKIM Checker, DMARC Checker, and DMARC Generator — support every stage of this journey, from initial deployment through ongoing enforcement.
Get deliverability tips in your inbox
Join 2,000+ email professionals who receive our weekly newsletter with actionable tips on improving inbox placement, sender reputation, and email authentication.
No spam. Unsubscribe anytime. We practice what we preach.